Monday, March 14, 2016

Pack Meeting - Minute to Win It

For my first pack meeting I decided to go with a Minute to Win It theme.  The first thing did was figure out how much time I needed to fill.  As this was my first pack meeting, I wasn't too sure.  We have 1 hour and 15 minutes to fill.  The first 5 - 10 minutes is taken up with flag ceremony and announcements. We needed to save at least 15 minutes at the end for awards and treats.  So I had about 50 minutes to fill.  With Minute to Win It the games obviously only take a minute, but including set up and explanation time, plus repeating it a few times so everyone can participate I figured I needed to come up with 7 games.  I searched the internet for different game ideas and wrote down anything that sounded fun.  I ended up with a couple pages of ideas, so then it was time to pare it down to what would work best for us.  The games I chose (I feel like I'm forgetting one, but don't remember as it was two years ago) are:

Mummy Wrap
Cereal Box Puzzle
Card Toss
Balloon in the Air
Apple Stacking
Towel Races
Bubbles and Hula Hoops

Once you choose your games, write up your list of items you will need.  For these games I would need toilet paper rolls, cereal boxes, apples, balloon, towels, cones, bubbles and hula hoops.  For the items I needed to purchase I hit up the Dollar Store, except for the apples which were purchased from the local grocery store.  As I was splitting my kids into 4 teams (Wolves, Bears, Webelos, and family) I needed to make sure to have enough supplies for that many groups.  The total cost of the whole activity was less than $20.

Mummy Wrap:
One person is chosen to be the mummy.  The others are each given a couple rolls of toilet paper.  The "mummy" starts out holding one end of the toilet paper.  When they are given the word to "go" they try to get their mummy completely wrapped first.  The team that finished first got 2 points, each team that finished got 1 point.


Next up was the cereal box puzzle.  I collected some cereal boxes at home and cut off the front of 4 boxes.  Each box front was then cut into 12 pieces.  Each group was given an envelope with the puzzle in it.  When the time started they pulled out the pieces and worked together to put the puzzle together.  Again 2 points were given to the team that finished first and 1 point to each team that completed their puzzle.


Next we did a card toss.  Each group was given a trash can and a deck of cards.  The boys took turns throwing the cards at the trash can.  At the end of the minute we counted up who had the most cards in the trash can.  Winning team got a point.


Next all the kids were given a balloon.  Object of this game was to keep the balloon in the air by hitting it.  If it fell and hit the ground you were out.  The teams all got 1 point per person still in it by the end of the round.


For apple stacking each group was given, I think, 4 apples.  It may have been 3, again it's been a couple years.  :)  When the time started the boys had to stack the apples one on top of another into a stack, which had to stay up for at least 3 seconds.  This one was a lot harder than it seemed like it would be.


 For the next game we had cones set up and each team was given a towel.  The boys had to sit on the towel and go down around the cone and back to starting using only their feet and bottoms to inchworm themselves along.  This one was really entertaining to watch.


The last game we played involved blowing bubbles through hula hoops.  This also ended up being more difficult than it seemed like it would be.  The bubbles didn't fly as far as we thought they would, so we had to let the boys all move forward a couple steps.  They took turns being the hula hoop holder and the bubble blower.


Not all the boys necessarily participated in every activity, but when they weren't participating they were cheering on their team mates.  The kids all had so much fun with this one.  We will repeat this again at some point.  Lots of smiling and laughing going on.  I don't remember what the winning team got, but it was some little prize or another.  After closing ceremonies everyone got a treat, so nobody was unhappy.

Wednesday, March 2, 2016

Pack Meetings

For me I think that pack meetings are probably the hardest part of being the Cub Master.  Due to his work schedule my predecessor was pretty much just doing awards and treats.  With his crazy schedule I don't blame him at all.  When I became Cub Master I wanted to take Pack Meetings to being something fun for the whole family.  That's what I remember them being as a child.  No I wasn't a Cub Scout, but my family has been heavily involved in Scouting since before I was born.  So for me a pack meeting should go as follows:  a flag ceremony, opening prayer, announcements, an activity for the whole family (parents rarely participate, but siblings do), awards, retrieving the colors, a closing prayer, and treats.  One thing I often forget to do, as I'm in the middle of running things, is to take pictures.  It is great to have pictures of your activities.  We use them to make a video of the previous year in review for our Blue & Gold Banquet.  We also try and throw them into a Dropbox for parents to view and download.  It is fun having those scouting memories!  Plus, it is helpful in remembering what you have done, what was successful, and maybe what wasn't.

I get flustered sometimes on the standing in front of a group of people talking.  I often feel like I say the wrong thing or something just really stupid, but the boys don't care.  They just want to have fun at scouts!  At the end of the day, that is my goal - to make it fun.  I want the boys to want to come to scouts.  I may make a fool of myself from time to time, but it isn't about me.  Since the end goal is for the boys to have fun, I try my best to come up with pack meetings that fulfill that.  I haven't written down all my pack meeting plans anywhere, so I am going to do my best to write up the different themes we have had and what we have done.  After my first pack meeting I had one scout, whose last meeting it was, tell me that he was so sad to leave because that was the best pack meeting ever.  It made me realize I was on the right path with what I was doing.  It makes the planning, and the stress that often comes with it, worth it.  Hopefully what we have done and found to be successful will help you.  Just remember, at the end of the days it truly is all about the boys.

Tuesday, March 1, 2016

Blue and Gold - Flight

For this year's Blue and Gold Banquet we chose to go with a flight through the ages them.  Again we decided to begin with figuring out the decorations.  We went through a few different ideas, but finally settled on one.  The modes of flight we highlighted were kites, hot air balloons, airplanes, and space shuttles.  We were going to throw a dirigible in there, but ran out of time due to my having surgery a week before our banquet.  I suggest avoiding surgery right before your event.  We had our modes of flight laid out as follows: kites on the side walls, the dirigible was going to be on the back wall behind the food, hot air balloons as the center pieces, paper airplanes strung up above and a cardboard space shuttle up front.

With that plan in place the next thing to do was figure out how are we going to do it.  We always have the scouts help with the decorations in one way or another, so we decided to have them decorate kites and fold paper airplanes.  For the kites we purchased white poster board.  We were able to get 5 small kites out of each poster board and one large kite per poster board.  We had 4 large kites with the Bobcat, Wolf, Bear, and Webelos insignia on them.  We recycled the insignia from the previous years banners.  The boys were given a stack of kites and the craft bucket and told to go at it.  They each made at least two kites, some made more than that.  We used blue and yellow ribbon for the tails of the kites.  So as the boys colored two of the den leaders and I worked on cutting ribbons and tying tails.  The tails were probably about a foot long with 3" ribbons of the opposite colored tied down the length of it.  So one long blue tail with 3 yellow ties or vice versa.  Once the boys were done with the kites we had them start folding paper airplanes.  The airplanes were all made from yellow or blue card stock.  We asked them to all fold them the same way as they were for decoration.  Once they had folded over 90 airplanes we let them have at a pile of construction paper to fold whatever type of airplane they wanted.  They split off into groups for the last 20 minutes of that meeting with their dens to work on rank objectives.  Once we had the paper airplanes home we cut straws into 1-2" pieces and taped them to the tops of the airplanes.  So they won't hang funny you need to find their center of balance.  To hang them we threaded a string through the straws and strung them across the gym walls towards the ceiling.  Now that we had the boys kites done and the airplanes folded, we took the 4 large kites added the insignia and added yellow or blue construction paper around the outside for some color.  Some of our leaders had real kites which they brought and hung up for extra pops of color.  Wall and ceiling decor done!  

POSTER BOARD KITE TEMPLATE:


 Next we worked on the center pieces.  We again used square tissue boxes as the base.  This time though we cut them in half for baskets.  We spray painted the tissue box baskets either blue or yellow.  Once those were done they were set aside for drying.  We decided to use helium balloons for our, well balloon.  We debated using a non-helium balloon and using skewers to hold it up, but the helium balloons were just much cooler.  For the bottom part of balloon we took a standard 8.5" x 11" paper and cut it into strips that were 8.5" x 2".  We then wrapped it into a circle and taped it close.  We used regular sheet paper as card stock or construction paper were too heavy for the helium balloon to hold up well.  We then took blue and yellow skinny ribbons and cut them into 5-6" strands.  You needed 4 strands per balloon.  We used yellow ribbon for the blue boxes and blue balloons and blue ribbon for the yellow boxes and yellow ribbons.  On the ribbon you want to use the skinny, lightweight ribbon or the balloon can't hold up for long.  We had printed out the 4 insignia again for each of the hot air balloons.  My teens helped cut them out and glue them to all the boxes.  Once the boxes were done we set them aside again.  Next we took the circle paper rings and the ribbon.  We taped the ribbon to the paper.  You need to have the 4 strands fairly evenly placed around the paper.  We eyeballed it as it didn't have to be perfect.  Once that was done we put them in with the boxes and set it aside until day of the banquet.  Day of the banquet we had blue and yellow balloons filled with helium.  To assemble everything we took a balloon, taped on the paper circle at the bottom so it covered the tied end.  Then each of the strings dangling from the paper circle were taped into each corner of a box.  And voila!  You have a hot air balloon.  We purchased some blue and gold Easter hay for the inside of the box so that people weren't just looking at the plain inside of a tissue box.  We put one box on each of the dining tables and one on the cake table.  On to the next project.


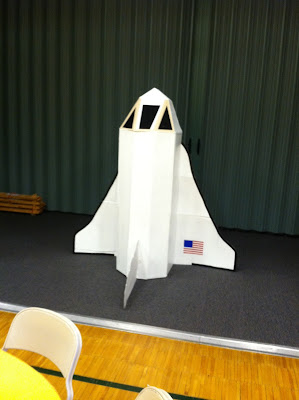
The Space Shuttle was the biggest project of all.  My husband brought his skills as a builder to bear again here.  He grew up on Air Force bases, so to him having the shuttle look recognizably like a space shuttle was important.  In my head I'm thinking something more cutesy.  I should have known better!  Google sketch-up to the rescue again!  My husband drew up plans on sketch-up for how he would make the shuttle.  A friend of mine had kindly donated their water heater box to us.  I'm sure my husband could provide better instructions, but from what I saw he cut long sections of box and taped them together to form the shuttle.  He then painted it white.  He cut the wings and tail out of spare card board pieces.  These were also painted white.  Then using some black paint he hand painted on the windows and the black outline of the wings.  We happened to have some red and blue paint on a desk in our bedroom, so he also painted on the US flag on the wing of the shuttle.  It ended up looking great!


We had planned on a dirigible for our back wall behind the food table.  However due to time constraints from my foot surgery we just didn't have time.  This is the sketch of what we were planning on doing.  We were just going to make it out of a big roll of paper.  (Sorry for the sideways pictures.)


For the invites I found something on Pinterest that I knew would work perfectly.   Using this as a template I made up our plane tickets that were handed out to each of the scouts and the boys who would be joining us this year.  Being LDS all our boys are invited to join scouts when they turn 8 years old.  The plane tickets were printed on yellow card stock and the ticket holders were printed on blue card stock. The holders were folded somewhat in thirds.  I used the ticket as a guide compared to the holder where the wording is.  Then folded it there and again.  The final third wasn't a true third, but that was fine.  I cut it down so that it was just a small corner that would hold the ticket in.  I taped this part down.  Just like that the tickets are ready to be handed out.


 We were expecting over 100 people for our banquet, so for dinner we went with spaghetti, a meat sauce, rolls and a salad.  We had cakes from Costco for dessert.  A chocolate cake with the American flag and a white cake with an airplane on it.


The final set up: